


BSU041917
 Hi stampers and welcome to this weeks Broke Stampers Unite challenge. This week our focus is color combo. Old Olive, Pear Pizzazz, Daffodil Delight, Calypso Coral and Crumb Cake. They tell me that I'm the one that picked this combo. I'm not sure about that but if so what was I thinking??? Hahahaha talk about challenges. I was stuck. But then I grabbed my new Eastern Palace Bundle (that's available to preorder May 2nd by the way). I figured if I added a new set with a weird combo I'd get something that looked eye catching anyway. This set has some really cool dies to it so I started there. Daffodil Delight was cut with the doily style die and the cool thing about it is that it doesn't cut it completely out of the card stock. More like a doily window cut. I was then able to layer color behind it as well as more die cut outs in front of it. The versatility of this set is amazing. I just went through and started layering the different colors on the project. The stamps that coordinates with the dies are a fun way to add all over designs as well as having the featured sentiment. I do have a bit of contraband daffodil delight ribbon but a girls gotta use up even the old stuff right? It worked. So that's my offering for this challenge. It's a lil different than the norm but I'm good with it. Hope you've enjoyed it also.
Now hop on over to Terri's Blog HERE and Stace's Blog HERE and see how these ladies fared with this color challenged. I'm sure it was better than my strange creation hahahaha then if you are feeling really ambitious and creative then try this combo out for yourself and share your creation with us at our Broke Stampers Unite Challenges Facebook page HERE
Have a great week and come back often. I'm doing a series on the blog of the upcoming retiring sets from the 2016-17 Stampin'Up! catalog. I'm showcasing a different set each day with links on where to purchase them Some are even as much as 50% off so check back each day. You can always look at what's retiring and the prices HERE
Enjoy your day and Thank You for stopping by.
Botanical Blooms

So this set of cards was made using the Botanical Blooms stamp set and dies. This set is also scheduled to retire May 31st. I'm a sucker for florals. and the bundle as a whole is such a great combo. This set is really great for basic quick cards as well as stepping them up a notch adding the dies and making masterpieces. Now for the great news....drum roll plz.......it's on sale! Yes that's right you can get not only the stamps but the dies at a special price. The dies are half off so at $16.50 makes a great steal of a deal. The stamps are only $12.75. Wow....awesome deal for both....what are you waiting for??? go get some. The link above with take you right to the items.


Hello Stamper's,
I want to talk to you today about Paper Pumpkin. About a week ago or so I was urging you to get in on the Paper Pumpkin Kit for April because it was a special kit designed by the Stampin' Up! CEO Sara Douglas. Well those of you that ordered should be getting your kits soon.. Now it is too late to get this months kit but you can always sign up for next months.
In just a moment I'm going to show you a great video from Sara on how to assemble your kit contents. But keep in mind as you watch that even if you missed out on this months kit, these are monthly kits that will come straight to your door, and are different each month, with everything you need to assemble. You can sign up for 1 month and just try it out....or you can choose to prepay for 3, 6, or even 12 months. These kits would make a great gathering project for friends or even a family project for teachers and such. What a great way to get everything you need to make beautiful hand out gifts for your kids Teacher's. Think about it. Watch the video and see how easy it is to assemble and create beautiful projects.
Alright here's the video and enjoy.
Fresh Fruit

I'm going to continue my tour through my favorite retiring sets. Again this Whole suite was one I didn't play with enough and hoped would make another year. Look at the colors in this suite....look at it! LOL I love love them. The stamp set is Fresh Fruit and it has some wonderful matching Designer Series Paper called Fruit Stand which just happens to be on sale. So you'll want to get on over to my store....(you can click the links above) and get these wonderful sets before they are gone. This again is one of those sets that has a lot of versatility to it. Not only can you do these fun fruits with it....but the lemon one can also be used as a flower! Yes...and I just love the two-step stamping aspect of this set. Two-Step stamping makes it so easy to create great card results by layering the inks instead of always having to color them in. BUT if you look at the outline images that are included here you can do the coloring book style coloring or even watercoloring of the images if you want also. You don't want to miss out on this set. I mean look at the great sentiments included with it. It's a great addition to your library of stamps. So hop on over to my store and get these product before they are gone. They have a tendency to sell out fast so don't miss your chance. Once they are gone they are gone for good.

Kinda Eclectic
 It's that time of year when we play out with the old and in with the new. Stamp Sets that is. Though I LOVE to get new sets we are left with having to say goodbye to some really good one's. So in this post I'm going to feature a stamp set that is going away but that has been a favorite of mine since it's release. This set will be available for purchase only until June 1. So be sure to get it before it's gone. Kinda Eclectic The artistic qualities of this set makes it so easy to create stunning projects with only a few items. I've been favoring this color combo of Basic Black, Flirty Flamongo and the new Lemon Lime Twist
(in with the new right?) I love how simple these
 cards are. Straight stamping, a little fussy cutting of the butterflies a couple card layers and Wow. These projects can be done in minutes for those of you who don't get a lot of time to play, but want great looking results. I'm a quick stamper at heart. I like to be able to sit down and get it done. This is one of those sets I could do that with. You can click the stamp set name above to place your order. Don't let this one slip away on you.
 BSU031217
Hello Stampers and welcome to this weeks Broke Stampers Unite Challenge This is our Technique Week so we decided to do a technique that I personally haven't seen used in a while. It's called Classic Ink Wash. You basically take an image....stamp it and then with an Aqua painter and water you wash the lines to give it a more watercolor look. The example I found did a better job of washing away the original lines than my sample. When I tried to take it that far I ended up with a mess that looked like someone splashed water on and ruined. It wasn't pretty. So after another go round I ended up with these lovely washed pears. You can still see my lines but over all, I like the look. I used the set Fresh Fruit with the beautiful matching DSP Fruit Stand and you can get these items and more at my
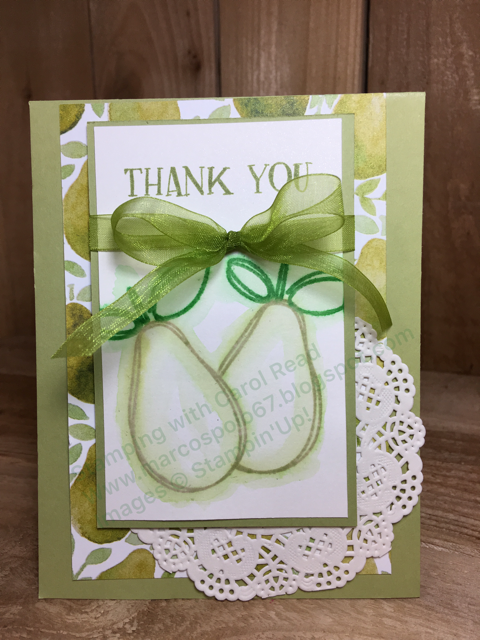
Now hop on over to Terri's Blog Here and Stace's Blog HERE to see what these ladies came up with for this challenge. You can also play along and post your Challenge creation at our Facebook page here
If you'd like to see what I'm up to the rest of the week be sure to visit my Facebook page Stamping with Carol Read I try to post a creation or two at least once a day.
Have a great week everyone, and get stampin' :)

Color

Today I was cleaning up the stamp room and when I got done I sat down at my nice clean work station and grabbed up a few colors. I had seen a card recently that was made by applying ink directly to the block then stamping the block on the paper for a background. In this case I grabbed my Stampin' Write markers in Island Indigo, Bermuda Bay and Pool Party. I then scribbled the clear stamp block with each color in an ombre' effect. I then stamped the dragonfly in each of the three ink pads of the same colors and fussy cut them out. I wrapped some silver cording..(long retired but I love it) and when I finished I had intentions of layering it all on a card base of Bermuda Bay. But this color combo just made me sit back and say WOW! that's such a pretty combo. So right away I needed to take a photo....all the elements were right there so I staged up my photo and was pretty happy with it. It wasn't until I posted it that I realized I forgot to put the card base on. Oh well it still looks great right? I love it when I can laugh at myself, and now you can laugh with me.
I'm jiving on this color combo so much I decided the blog needed a change up so I set out and viola....after a couple hours..... new blog colors. I have a lil tweaking to do yet, I do this so infrequently that I have to learn it all over again when I change it. ANYWAY...that's my take on color for today. I love when I get inspired by it.
BSU030517

Hello and welcome to this weeks Broke Stampers Unite Challenge. This week our Theme is EASTER! Yes, can you believe it's just around the corner? I do wish everyone a very Happy Easter. Mine will be a pretty quiet one, not much happening around here. But I do know that many do family gatherings so if you are one of those then Enjoy your family time.
Now to get to this weeks card. I am pretty shy on Easter style sets. The ones I do have are retired ones so this was sort of a challenge for me in that I had limited resources. BUT, I did manage to go with a floral style. I Started with Butterfly Basics stamp set. I stamped the base layer in a combination of Daffodil Delight and Pear Pizzazz inks. I inked my stamp in the DD first and then the PP and it gave a nice veragated look. gives it a lil depth and character I think. I then stamped the flower group image in Basic Gray ink on a scrap piece of Whisper White and fussy cut the image out. I colored it in using Pear Pizzazz, Daffodil Delight, Soft Sky and a bit of Wild Wasabi Stampin' Write Markers. It made it quick and simple. (I really like simple)! LOL
I then centered it on the card using some Stampin' Dimensionals. I added a little ribbon tie with some retired DD cotton ribbon. This I have to say is one of my favorite ribbons and I sure do hope they bring it back soon. (a girl can dream) I finished by stamping my sentiment in Tempting Turquiose on some Whisper White and snipping the right edge with a a pair of snips. Yes I have the Banner Tripple punch but well I didn't use it but you totally could. LOL I then layered it all on a base of Daffodil Delight card stock and Voila done!
Easy....Simple....Clean.
Just how I like it.
Have a great week everyone. Stay tuned over the next six weeks or so as the yearly retired list comes out followed by the New Annual Catalog. This is such an exciting time of the year. Also coming up will be our Annual Virtual Convention for us long time stampers that don't get the pleasure of making it to Stampin' Up's Big convention. What does that mean??? It means lots of stamping and blog postings besides just our weekly BSU posts. Thank You so much for coming by......take care.
BSU032917

Welcome to this weeks Broke Stampers Unite Challenge. This happens to be the fifth Wednesday of the month so we focus on a 3D or ABC (anything but cards) project. I had some dear friends come over today and they showed me how to make this lovely basket. Not bad for my first try. I love the way it has the slatted sides. I have seen these floating around the Internet being made and was really excited to try it out myself. Thank You Darlene for the come to my home tutorial. I know I should probably have posted instructions but well I'm not going to. Instead I'm going to leave a YouTube link on how this was inspired. Here I then, after making the basket, added some flowers using the Flower Patch stamp set and the matching Flower Fair Framelits from the annual catalog. The colors I used were Tangerine Tango, Daffodil Delight, Wild Wasabi. The DSP used on the sides came from the Cupcakes and Carousels stack in the Occasions Catalog.
So there you have it. Isn't this just the sweetest lil paper basket?
Have a wonderful week everyone. Thank You for stopping by!
BSU032217

Hello and Happy Spring! It's time for another Broke Stampers Unite Challenge. This week we are focusing on this lovely stamp set in the Occasions Catalog...(link on the right) called Beautiful You.
If you've been following me at all you will know this is one of my favorites from this catalog. It's just so simple to make stunning cards with and also so very versatile. I had a blast making a bunch of Thank You cards with this set for my Sister-in-Law who sells LulaRoe. It's such a perfect set for that purpose and so easy to create multiples fast. Of course she loved them. Yaaaaay!
So for this set I went with a Pink Pirouette base and layered some Whisper White on top. I then added a piece of the beautiful Glimmer paper that was featured in Sale a Bration catty but sadly has been sold out. No wonder right? It's just gorgeous. Would be cool to see it or something similar to in in the upcoming annual catalog. (yes.....it won't be long before that one is released). I love this time of year....so much happening. Ok back on track here.....I cut out an oval in Whisper White and then a larger on in Pink Pirouette with the awesome Stitched Framelits. LOVE these so much. They offer a great finished look. I stamped my image and sentiment in Basic Gray ink. I love the combo of gray and pink. So pretty!
So this is my offering for today. If you haven't purchased this lovely stamp set you should! You can't go wrong with it. Hope you've enjoyed this weeks post....now hop on over to Terri's Blog HERE and Stace's Blog HERE
Have a great week everyone. Thank You so much for stopping by.
BSU031517

Hello and Welcome to this weeks Broke Stampers Unite Challenge. Alright......I'm late with this...sorry. I forgot to actually write the post and schedule it. Between watching for April the Giraffe to drop that calf and our new burst of Mario 3D World I've been distracted.
So this weeks challenge is all about color. Pear Pizzazz, Flirty Flamingo, Peekaboo Peach and Daffodil Delight. I chose a set from the Annual catalog that has long been a favorite. Watercolor Wings and the matching framelit dies. The sentiment is from the Occasion's Catalog set All Things Thanks. Card base is Flirty Flamingo and I cut the butterfly out of the Whisper White card front layer, and then popped the wing tips out. The smaller butterfly cut out is done with Peekaboo Peach layered on the front and then embellished with some Rhinestone Jewels. I finished off with some Wink Of Stella lightly painted all over the images to give it a wonderful sparkle.
BSU030817

Welcome to this weeks Broke Stampers Unite Challenge. This week is our Technique week. Im excited because this is one of my favorite techniques to do. Its called DTP or Direct To Paper. There are a few different interpritations of this but to me it means transfering ink direct from the ink pad to the card. I seen people rub it on or just swipe the ink pad across the card stock. But I like to just lay the inkpad onto the card stock so it leaves a nice color block and then use it as my background to highlight another stamped image. On this card I used Sahara Sand as my DPT part. I then stamped my image from Avant-Garden in Rose Red. I then stamped the sentiment in Early Espresso I put all this on a card base of Early Espresso and added a bit on Whisper White Cotton Ribbon.
That's it.......makes a nice quick and stunning background spotlight feature. Hope you will give it a try. Like I mentioned earlier it is one of my favorite techniques.
Hope you enjoyed this weeks card...be sure to head on over to Terri's Blog HERE and Stace's Blog HERE to see what they came up with this week. Also if you'd like to play along you can do so and add it to the Album for this week on our Facebook Page Broke Stampers Unite Challenges HERE
Have a great week everyone and Thank You for stopping by.
Beautiful You again

Today I found myself playing once again with the Beautiful You stamp set. If you are a stamper and do not have this set.....you need to get it. It's so much fun to play with and they make great Girlie cards. click the link on the right to the Occasions Catalog, you'll find it in there.
Color inspiration
 So I just did an overhaul of how I store my ink colors. In doing so it put Basic Gray and Flirty Flamingo next to each other. I LOVE this combo. So I had to make a card using those two colors. I did throw in a bit of Pink Pirouette. Anyway Just wanted to share.....
BSU030117

How is your week going? This week we are focusing on The Sale-A-Bration catty. If you haven't had the chance to get any of the fun sets from SAB 2017 you need to. I have a link to the catty on the right of this post. I love SAB each year. For me it's a fun time to stock up on all my supplies and things that I'm running low on because you can earn free sets for every $50 you spend. Besides, they always release it with they occasions catty and of course there are To Die For sets in there. LOL So meeting the minimums to earn free sets is easy.
About the card......This week I paired the Blooms and Bliss DSP out of the annual catty with the Avent-Garden stamp set in the SAB catty. I was happy with how well these two products worked with each other. I did a base of Island Indigo and layered a fun small print pattern DSP on it. I then made a couple banners with other patterns from the same DSP with the Banner Triple punch. I slipped in a length of Mint Macaron satin ribbon for texture. On my Whisper White card stock I stamped the long stemmed flower in Island Indigo and layered on a sentiment stamped in Sahara Sand. Pretty quick and cute card.
Hope you enjoyed this weeks card...be sure to head on over to Terri's Blog HERE and Stace's Blog HERE to see what they came up with this week. Also if you'd like to play along you can do so and add it to the Album for this week on our Facebook Page Broke Stampers Unite Challenges HERE
Have a great week everyone and Thank You for stopping by.
BSU022217

So I'm pretty excited about this card. This week on BSU we are featuring the Dragonfly Dreams stamp set from the Occasions Catalog. I also paired mine with the Detailed Dragonfly Thinlits. Love Them!!! This is one of those cards that sort of grew as I was stamping it....no prethought out plan here. LOL
I started with a base of Old Olive card stock and I layered the leaf pattern from the Serene Scenery DSP from the Annual Catalog. I've had this paper for a while but haven't used it much....this was perfect. I cut out the detailed dragonfly in Old Olive. I then stamped the detailed dragonfly image in Island Indigo then I took the shadow wing image and colored it on the stamp with Old Olive, Pumpkin Pie, and Island Indigo stampin write markers.....huffed on it and stamped it over the detailed image. Love how it blended the colors so nicely. But.....it was a solid layer.....and i wanted to be able to get the detailed green cut to show up more so I decided to detail cut the stamped dragonfly. Oh Oh Oh....loved that effect. So I layered them with dimensionals added some bling to the center of the dragonfly and glued it down on my DSP. I stamped the sentiment that comes with this set in Island Indigo. I just love how it came out!
Hope you enjoyed this weeks card...be sure to head on over to Terri's Blog HERE and Stace's Blog HERE to see what they came up with this week. Also if you'd like to play along you can do so and add it to the Album for this week on our Facebook Page Broke Stampers Unite Challenges HERE
Have a great week everyone and Thank You for stopping by.
BSU021517

Hello and Welcome to this weeks Broke Stampers Unite Challenge. This week is all about Color Combos. So Saffron, Blushing Bride, Crumb Cake, and White. When I laid these colors together I instantly thought how delicious they looked and I had to use the Cool Treats stamp set. Doesn't this card just make you want in ice cream cone?
I started with a base of Crumb Cake and layered a piece of So Saffron. I stamped the lil dot from the Cool Treats stamp set in So Saffron to give it a lil boarder interest. I then used the matching Frozen Treats Framelits to cut out my ice cream scoops, the cherry and the cone. I stacked them all together using some dimensionals to pop them off the page a bit. I stamped the sentiment in Blushing Bride and added a couple Rhinestone Jewels to the top and bottom. Layered the whole thing onto my card base and then I had a craving for ice cream for three days afterward. LOL
Hope you enjoyed this weeks card...be sure to head on over to Terri's Blog HERE and Stace's Blog HERE to see what they came up with this week. Also if you'd like to play along you can do so and add it to the Album for this week on our Facebook Page Broke Stampers Unite Challenges HERE
Have a great week everyone and Thank You for stopping by.
BSU020817

Welcome to this weeks BSU Challenge. It's techinique week, and this weeks technique is Watercolor.
I chose to do a watercolor background using an aqua painter and Pacific Point ink on Shimmery White Card Stock. I pressed ink into my ink pad lid and then using the Aquapainter swiped the ink all over my background layer. If you try this and you don't get an intense enough color you can let it dry some and then apply more ink using the same method. I then stamped the two smaller balloons using the Tuxedo Momento ink pad. Using the Up and Away thinlit dies I made the Red and yellow balloon. Istamped the sentiment in Real Red and layered the whole thing on Real Red card stock. I finished off with a few clouds, also using the thinlets, and popping them up with some dimensionals.
Hope you enjoyed this weeks card...be sure to head on over to Terri's Blog HERE and Stace's Blog HERE to see what they came up with this week. Also if you'd like to play along you can do so and add it to the Album for this week on our Facebook Page Broke Stampers Unite Challenges HERE
Have a great week everyone and Thank You for stopping by.
BSU020117

Welcome to this weeks Broke Stampers Unite Challenge. Because this it the first of February our theme is Love/Valentines. I what to do, what to do? I decided to use the Beautiful You stampset and put a Valentines twist to it. I started by making a mask for the floral heart from the Bloomin' Love stamp set out of the Annual Catalog. I then stamped the heart upside down on some Whisper White card stock in Real Red and placed the mask I made over it. I stamped the girl from Beautiful You at the point of the heart to make it look like her dress. I did some watercoloring on the background with an aqua painter in Old Olive and Marina Mist and let it dry. I also used the aqua painter to color in the dress with Real Red. I then stamped and cut out the small flowers from the Bloomin Love set and with Dimensionals popped them up on the dress skirt. I added some Rhinestone Jewels to give it a lil bling. Layered all of that on some Old Olive and the a base of Real Red. I used some silver ribbon to finish it off and stamped my sentiment in Basic Black. The picture doesn't do it justice but I do love how it came out.
Hope you enjoyed this weeks card...be sure to head on over to Terri's Blog HERE and Stace's Blog HERE to see what they came up with this week. Also if you'd like to play along you can do so and add it to the Album for this week on our Facebook Page Broke Stampers Unite Challenges HERE
Have a great week everyone and Thank You for stopping by.
BSU012517

Hello....how are you all today? Welcome to this weeks Broke Stampers Unite Challenge. This week we are focusing on the Occasions Catalog. Ewweeee I Love so many of the sets in there this year.
ONE of my favorites is the Cool Treats Suite. I couldn't decide what to show you all so I decided to go with a few different projects and feature the Suite as a whole. I love the way all the papers, stamps, and framelits all go together so nicely. Look at the color combo also, so cute!
You can see in the picture what colors I used as well as the Tasty Treats Specialty Designer Series Paper. I added in some Peekaboo Peach Ribbon as well as a bit of Mint Macaroon ribbon....yes I know its not in the suite but it worked and its what I had LOL
This set is a lot of fun to just play with and piece the different elemnets together. So many fun and delicious looks!
Hope you enjoy playing with this suite like I did...now head on over to Terri's Blog HERE and Stace's Blog HERE and see what they have come up with for this weeks challenge.
Lift Me Up

So I sat down with the Lift Me Up stamp set the matching framelits and the matching SAB paper stack. I approached it all a bit differently than I normally do. I cut out all my framelits pieces first. The balloons the clouds the different color backgrounds. Then I worked on assembling the cards.
This was a good thing for me I think. I get bored with cutting out the pieces and so by doing all that first it made assembling the cards so much faster and smoother.
So if you struggle with some of these sets that require a lot of thinlit cutting and like me get bored or lazy about cutting and assembling each card....so you get one done and put the set away......you may think about trying it like I did.
Cool Treats

Played with Cool Treats stamp set tonight. What fun lil creations you can make. I really like this color pallet also. Watermelon Wonder, Pool Party, Chocolate Chip, Peekaboo Peach
Beautiful You stamp set

Ever just lay in bed in the morning ....thinking about getting up but fighting the idea?? I was doing that early this morning when this idea came to me. I've seen and even tried doing the watercolor add on to the Beautiful You stamp set. Only stamping half the image and then adding a full length dress to the bottom of it with watercolor pencils. Well I thought and small flower set would look awesome also. So I drug myself out of bed and trudged into the craft room sat down and stared at a few sets with smaller sized flowers. I went with this lil one from Blooms and Wishes stamp set. I liked I could add the rhinestones to the centers of the flowers.
Play around with it....I'm sure there are a bunch of images that would work great for this idea!
BSU011816

It's time for our BSU challenge. This week is about color. Our Pallet is Real Red Pink Pirouette Melon Mambo and Wisteria Wonder.
It was a bit of a stretch but I made it work. LOL Card base is Real Red layered with Whisper White. On the white I stamped using the Sealed With Love stamp set from the new occassions catalog a couple images in Wisteria Wonder and Melon Mambo to create the background DSP look. I then stamped my sentiment on Whisper White in Wisteria Wonder and layered it with Pink Pirouette and Wisteria Wonder. Using the matching Love Note framelits I stamped the heart and cut it using the coordinating framelit. I strung a length of Silver Sequin ribbon to add bling. I don't know who came up with this combo....(it was me I think)...but it was def a challenge. LOL
Hoipe you have enjoyed this weeks card please feel free to try it out for yourself. If you do play along you can also post your verion to the appropriate album on our Facebook page.
Don't forget to hop on over to Terri's Blog Here and Stace's Blog Here to see what they came up with this week. Have a great week everyone Thank You for stopping by...
DSP Hack...

Hey everyone. I just wanted to share a fun lil Technique that my upline shared with us recently. I just love all the DSP designer Series papers that Stampin Up offers. Sometimes they are so pretty it's hard to use them. Yes I'm guilty of DSP hoarding. But this is a fun and easy way to get you to use your pretty papers and get the most out of just a lil. I used the Carousel Birthday stamp set and the Cupcakes and Carousels DSP stack and chose four DSP prints. I cut them all to a 4x5.25 size. And then trimmed them down to four pieces. Any sizes you want just make sure you do the same measurements for all four designs. Then you just mix up the designs. I used a 4.25 x 5.5 sized piece of scrap card stock to arrange my DSP on and then trimmed up the excess leaving a great background layer for your card. Then I just chose my images and stamped them on Whisper White card stock layered them in coordinating colors and attached them to the front. Added a bit of ribbon and bam four quick and cute cards. It's a great way to make a lot of cards quickly. But still end up with a nice full layered card. I hope my explanation was helpful. There is a video that I may be able to link to....I'll try and find that and add it below.
I have a couple more sets I plan to make up real soon so stay tuned for those in the future.
DSP Video
Thanks for stopping by. Don't forget to come back tomorrow for my BSU post on color combos.
BSU011117

Welcome to this weeks BSU challenge. Our topic this week is Technique. For this weeks Technique we went with Joseph's Coat. I hadn't done this one before and it was fun trying it out. You start with a piece of Whisper White card stock and sponge some coordinating colors onto it. I used Night if Navy, Pacific Point and Marina Mist in a layered position top to bottom. You then stamp your images in versamark ink randomly, in my case, over the blues and heat emboss with clear embossing powder. You then use momento black ink and sponge it all,over the whole thing. The result is that the clear embossed areas resist the momento ink but adhere to the rest of the card stock. Once you are finished applying the black momento ink to your card then lightly wipe away the excess ink from the embossed areas. The results is a lovely verigated color effect. I then trimmed it down to desired size then layered it on Whisper White and Marina Mist layers onto my card base of Night of Navy. I stamped and embossed My sentiment in silver. The stamp set I used was Blooms and Wishes, available in the annual catalog.
Hope you enjoy this weeks Technique....be sure to give it a try. Remember you can always share your creations with us on our Facebook page.
Hope on over to Terri's Blog HERE and Stace's Blog HERE to see what they came up with this week.
Have a great week everyone! Thanks for stopping by.
Beautiful You Stamp Set


So I had a chance today to put some ink on this set! It's a new set from the Occasions catalog that was released today! So exciting. There are a lot of great sets in there. I have a link on the right of this post if you want to check it out. If you love to stamp I would highly suggest you take a look at it.
Also SALE-A-BRATION has started today! Yaaaaaaaay for every $50 you spend before shipping and tax you get to earn a free set out of the saleabration booklet. You'll also find that on the right for your viewing pleasure. This time of year is so much fun. Who doesn't want to earn free stamps???
So...stay tuned for my upcoming makes using these new stamps and so much more. Enjoy!!!


